This chapter contains the following topics:
Introduction to Physical Count
Creating Physical Count Transactions
Removing Physical Count Transactions
Printing Physical Count Worksheets
Creating Adjustment Transactions
Physical Count Continued Operations
Use the Physical count selection to perform an expanded physical inventory count. This selection allows high speed entry of physical counts through manual data entry or through the use of hand-held terminals.
You must specify the Expanded physical count method in Control information in order to perform a physical inventory count in this manner. If you specified the Normal physical count method, refer to the Physical Count Worksheets chapter.
To perform an Expanded Physical Inventory Count, follow these steps:
|
Step |
Description |
|
1 |
Create physical count transactions for the items to be counted. These transactions are created automatically and represent a suspended picture of the on-hand inventory levels. Select Create from the Physical count menu to create the physical count transactions. |
|
2 |
Print a physical count worksheet for the items, to be used for the actual count. The worksheet may be printed in either item number or location order, for any range of items with physical count transactions. Select Worksheet from the Physical count menu to print the worksheet. |
|
3 |
Enter the actual counted quantities of the items in the corresponding physical count transactions. As many as five separate counts may be entered for a single inventory item. Counts can be entered manually, or automatically if the counts were taken with a device such as a hand-held terminal. Select Enter from the Physical count menu to manually enter actual counts, or select Import to automatically import the actual counts. |
|
4 |
Review the accuracy of the entered counts by printing a physical count worksheet for the items, specifying to print actual counts and variances. In addition to printing the actual counted quantity for each item, the suspended on-hand quantity is printed, and the variance in quantity and cost between the two figures is shown. Select Worksheet from the Physical count menu to print the worksheet, specifying to print actual counts and variances. Make changes or additions to the counted quantities as necessary, using the Enter selection. |
|
5 |
Select Create adjustments from the Physical count menu. Automatically create adjustment inventory transactions for items whose actual counts differ from their suspended on-hand quantities. Upward and downward adjustment transactions are created only for the items that you specify. |
The inventory adjustment transactions may be processed further, using the Inventory selection. Use Inventory (Enter) to edit them as necessary. When all the required changes are made, use Inventory (Post) to post the adjustment transactions.
Passport recommends that once the physical count transactions have been created, you avoid computer operations that affect on-hand inventory levels for those items. These computer operations can be resumed after posting the physical count adjustments.
If you must continue these computer operations, refer to Physical Count Continued Operations.
Until the actual counting process is completed, it is a good practice not to remove or bring in physical goods to the area where goods are being counted.
If goods arrive after the count transactions are created, place them in an area where they will not be counted. If goods must be removed after the transactions are created, record the quantities being removed and include the quantities in your counted quantity figures.
This allows for a fixed relationship between the suspended on-hand quantity and the counted on-hand quantity, and ensures that the inventory adjustment quantity and cost (variance) are correct.
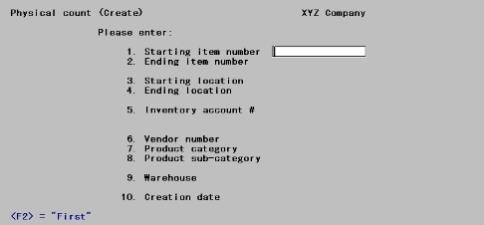
Select
Create from the Physical count menu.
The following screen displays:
Enter the information as follows:
1. Starting item number and
2. Ending item number
Enter the range of item numbers for which physical count transactions are to be created or press <F2> for the First item number.
|
Format |
Up to 15 digits |
|
Example |
Press <F2> to select the first item number. |
For field #2, select <F2> for the Last item number.
|
Format |
Up to 15 digits |
|
Example |
Press <F2> to select the First item number. |
3. Starting location and
4. Ending location
Enter the range of locations of the items for which physical count transactions are to be created or press <F2> for the First and Last item number.
|
Format |
Four digits or select the option |
|
Example |
Press <F2> to select the First item number. |
In field #4, you can select <F2> for the Last item.
|
Format |
Four digits or select the option |
|
Example |
Press <F2> to select the Last item number. |
5. Inventory account #
Enter the inventory account for which to create the transactions, or use one of the options:
|
<F1> |
For the next inventory account |
|
<SF1> |
For the previous inventory account |
|
<F2> |
For the default inventory account |
|
<F5> |
For All inventory accounts |
|
Example |
Press <F5>. |
6. Vendor number
Enter the vendor number to create transactions for only one vendor, or press <F5>to create transactions for All vendors.
|
Format |
Six digits or use the option |
|
Example |
Press <F5> to create transactions for All vendors |
7. Product category
Enter the product category to create transactions for only one product category, or press <F5>to create transactions for All categories.
|
Format |
Up to five digits or use the option |
|
Example |
Press <F5> for All product categories |
8. Product sub-category
Enter the product sub-category to create transactions for only one product sub-category, or <F5> to create transactions for All sub-categories.
|
Format |
Up to five digits or use the option |
|
Example |
Press <F5>. |
9. Warehouse
This field appears only if you are using multi-warehousing.
Enter the warehouse code for which you want transactions created, or use one of the options:
|
<Enter> |
For the Central warehouse |
|
<F5> |
For All warehouses |
|
Format |
Up to two digits for warehouse code or use the option |
|
Example |
Press <Enter> for the Central warehouse. |
10. Creation date
Enter the date that is to display and print as the on file as of date for the physical count transactions, or press <Enter> to use the System date.
The creation date is for reference only, and represents the date on which the picture is taken of your on-hand inventory.
|
Format |
MMDDYY |
|
Example |
Press <Enter> for the System date. |
Physical count transactions are automatically created for the specified items in the warehouse(s) designated.
For lot-controlled items, a separate physical count transaction is created for each lot number (if no lot numbers exist for the item, no physical count transaction is created).
If other physical count transactions are already present, and a duplicate transaction is encountered while creating new physical count transactions, Duplicate record encountered displays.
Options
You are then provided the following three options:
Skip duplicates
New physical count transactions are created only for those items that do not already have a transaction.
Replace duplicates
New transactions are created for all specified items. Any existing transactions are replaced by the new transactions.
Abort
The creation process is canceled. Any new transactions that were created prior to encountering the duplicate remain and no additional transactions are created.
Use the Enter selection to manually enter or change the actual counted quantities for an item's physical count transaction.
New physical count transactions can also be created in the Enter selection to add transactions for items that are found during the actual physical count. (Note that the item number and a status record for the corresponding warehouse must already exist in I/C Items and Statuses.)
Select
Enter from the Physical count menu.
For multi-warehousing, you are asked to specify the warehouse for which you want to enter or change counted quantities. Enter the warehouse code, or press <Enter> for the Central warehouse.
The following screen displays:
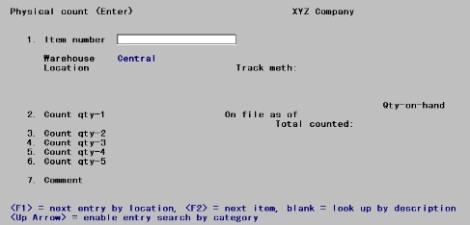
Enter the information as follows:
1. Item number
Enter the item number or bar code of the physical count transaction for which you want to enter or change counts.
Options
You may also use one of the options:
|
<Enter> |
To look by description |
|
<F1> |
For the next entry by location |
|
<F2> |
For the next item |
|
<Up> |
To toggle the search by category, item #, or location |
When the physical count transaction displays, the item's suspended Qty-on-hand figure is displayed next to the On file as of date, and the cursor is positioned at Count qty-1 for entry of the actual counted quantity.
|
Format |
Up to 20 digits for an item # |
|
Format |
Up to 24 characters for a category |
|
Example |
Press <F1> and then press <Enter> |
If you enter an item number or bar code for which there is no transaction, the current date displays as the On file as of date, and the current quantity on-hand for the item is shown.
A message displays to inform you that the transaction is not on file and you are asked if you wish to add it. Answer Y to add the new physical count transaction. The cursor is then positioned at Count qty-1 for entry of the actual counted quantity.
Continue entering the information as follows:
2. Count qty-1
Enter the actual counted amount. Negative values are allowed, and you may default to zero by pressing <Enter>.
|
<Enter> |
To reset to zero |
|
<F1> |
For next entry by location |
|
<F3> |
To delete an entry |
|
<F5> |
To correct an entry |
|
Format |
99999999.99999- |
|
Example |
Type: 240 |
3. Count qty-2
|
Format |
99999999.99999- |
4. Count qty-3
|
Format |
99999999.99999- |
5. Count qty-4
|
Format |
99999999.99999- |
6. Count qty-5
|
Format |
99999999.99999- |
Use Field number to change ? to enter additional counted amounts for this item in field #’s three through six.
The sum of all counts entered for a transaction is displayed in the Total counted field.
7. Comment
Use Field number to change ? to enter a comment for the physical count transaction.
|
Format |
Up to 25 characters |
|
Example |
Type: count and press <Enter> |
Use the Remove selection to delete a range of physical count transactions.
Select
Remove from the Physical count menu.
The following screen displays:
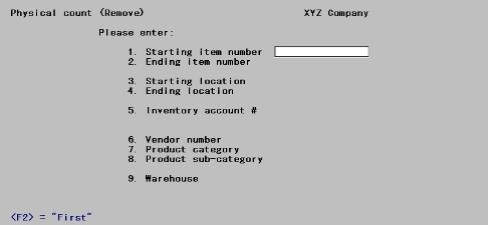
To specify the range of items for transactions that you want to remove, enter the information on this screen in the same manner as described for the Create selection.
1. Starting item number
2. Ending item number
Enter the range of item numbers for which physical count transactions are to be removed or press <F2> for the First item number.
|
Format |
Up to 15 digits or use the option |
|
Example |
Press <F2> then <Enter> to select First |
Options
For field #2 press <F2> for Last item number.
|
Format |
Up to 15 digits or use the option |
|
Example |
Press <F2> then <Enter> to select Last. |
3. Starting location and
4. Ending location
Enter the range of locations of the items for which physical count transactions are to be removed or press <F2> to select First.
|
Format |
Four digits or select the option |
|
Example |
Press <F2> and then <Enter> to use First. |
For field, field #4 press for the Last location.
|
Format |
Four digits or select the option |
|
Example |
Press <F2> then <Enter> for Last. |
5. Inventory account #
Enter the inventory account for which to remove the transactions.
Options
You may also use one of the options:
|
<F1> |
For the next inventory account |
|
<SF1> |
For the previous inventory account |
|
<F2> |
For the default inventory account |
|
<F5> |
For All inventory accounts |
|
Format |
Enter up to seven digits or use the options |
|
Example |
Press <F5> to select All then press <Enter> |
6. Vendor number
Enter the vendor number to remove transactions for only one vendor or press <F5> to remove transactions for All vendors.
|
Format |
Enter six digits or the option |
|
Example |
Press <F5> and then press <Enter> for All vendors |
7. Product category
Enter the product category to remove transactions for only one product category press <F5> to remove transactions for All categories.
|
Format |
Enter up to five digits or use the option |
|
Example |
Press <F5> then press <Enter> for All |
8. Product sub-category
Enter the product sub-category to remove transactions for only one product sub-category press <F5> to remove transactions for All sub-categories.
|
Format |
Up to five digits or use the option for All |
|
Example |
Press <F5> then press <Enter>. |
9. Warehouse
Enter the warehouse code for which you want transactions created or press <F5> for the Central warehouse .
|
Format |
Up to two digits of warehouses code or use the option |
|
Example |
Press <Enter> for the Central warehouse |
Field number to change ?
Make any needed changes, then press <Enter>.
Use the Import selection to automatically import the actual counts for physical count transactions.
|
Note |
Before using this selection, be sure to make a backup copy of your ICPHXF file/table. If you have to rerun the Import selection for any reason, you will need to restore this file to its original state prior to the rerun. |
If you use a hand-held terminal to perform the physical counting process, the Import selection can retrieve the actual counts collected by the device from a file and update the corresponding transactions.
In the import file, you must have the item number, item quantity and lot number if the item is tracked by lot numbers.
If importing the first time, when entering the fields you must specify the file type: fixed length or delimited. If delimited you can specify the delimiter character and the field order. You have to enter the delimiter character via a hexadecimal code. If you want a comma (",") to be the delimiter then they will have to enter 2C as the delimiter character. If you select fixed length then you must specify the start position and length of each field. You will be asked whether or not you want to save the import specifications.
If an import format was saved previously when using this selection, that format is displayed automatically.
Use Field number to change ? to make any necessary changes for the file to be imported in this session. You may also press <F1> to clear the screen to enter a new import format.
Select
Import from the Physical count menu.
*1. Warehouse
For multi-warehousing, you are asked to specify the warehouse for which the counts are to be imported. Enter the warehouse code.
Options
You may also use the options:
|
<Enter> |
For the Central warehouse |
|
<F5> |
For All warehouses |
|
Format |
Up to two digits of warehouses code or use the option |
|
Example |
Press <Enter> for the <Central> warehouse |
The following screen displays:
Enter the information for a new import format as follows:
1. Import filename
Enter the name of the file to be imported. If the import file is not in the PBS top-level folder (directory), include the drive letter or path name where it is located.
|
Note |
The file name must be in upper case when PBS is installed on a Linux server. |
|
Format |
Up to 14 characters |
|
Example |
F:\IMPORT.EXP |
2. Duplicate counts
Enter the letter that corresponds to the desired processing method if a count has already been recorded in the transaction.
Enter S to skip the import count if any count, including 00. You may default to S by pressing <Enter>.
Enter A to add the import count to the next available count field of the transaction or, if all count fields contain entries, add to the existing entry for Count qty-5.
Enter R to replace all existing counts in a transaction with the import count.
Options
Use the following options:
|
S |
To skip the duplicate counts |
|
A |
To add the duplicate counts |
|
R |
To replaces the duplicate counts |
|
Format |
One letter from the table above. The default is S |
|
Example |
Press <Enter> to accept the default |
3. Field format
Enter the letter that corresponds to the format of each field in a record of the import file.
Options
Enter the one of the following options:
|
D |
If the data fields in a record are in variable starting columns, and are separated by a specific, delimiting character at the end of each field |
|
F |
if each data field in each record always begins in a specific, fixed column. |
If you specify a delimited field format, two additional fields display for you to further define the delimiting character.
|
Format |
One character |
Delimiting char
This field will only need to entered if you selected D for the field format.
Specify the ASCII character used at the end of each field to separate the fields in a record. The character should be entered in its two-character hexadecimal form.
The corresponding ASCII character is then displayed in quotation marks next to the hexadecimal entry.
If the delimiting character is a comma “,”, enter 2C.
|
Format |
Two characters |
Text in quotes?
This field will only need to entered if you selected D for the field format.
Answer Y if the text fields in a record are enclosed in quotation marks. Otherwise, answer N.
Use the remaining fields on this screen to describe the item number, quantity, serial number, and lot number information in the import records. The fields that display depend on the field format that you entered in field #3.
|
Format |
One letter, either Y or N |
|
Example |
Type: N and then press <enter> |
4. Item numbers
Describe the method of determining item numbers, as follows:
Primary lookup by
Enter the letter corresponding to the first method to be used to locate each item number.
Enter I if the actual item number appears in the import record, or enter B if the item's bar code exists in the import record.
|
Format |
One letter, either I or B |
|
Example |
Type: I and then press <enter> |
Secondary lookup by
Enter the letter corresponding to the alternate method of locating the item number in each import record, or press <Enter> for no secondary lookup method.
During the import, the item number (or bar code) is initially looked up using the method specified for Primary lookup by. If a matching entry is not located using that method, the Secondary lookup by method is used.
|
Format |
One letter, either I for item or B for bar code |
|
Example |
Type: I and then press <enter> |
Field number
For delimited field formats, enter the relative field number of the item number (or bar code) in an import record.
For example, if you enter 4 for this field, the item number (or bar code) for each item would be found in the fourth field, and is preceded by three occurrences of the delimiting character specified above in field #3.
|
Format |
Enter up to two digits |
|
Example |
Type: 10 and then press <Enter> |
Start Position and Length
Length
For fixed position field formats, specify the starting column number and length of the item number (or bar code) field in an import record.
For example, if you enter a Start position of 15, and a Length of 10, the item number (or bar code) for each item would be found beginning at column 15 and extending for 10 characters.
5. Quantities
Describe the handling and location of the quantity in each import record, as follows:
Use 1 if blank?
Answer Y to import a default transaction quantity of 1 for any record whose quantity is spaces. Otherwise, answer N.
If you answer Y, any numeric quantity, including 0, is imported as the value in the record. If the quantity is spaces (blank), a quantity of 1 is imported. Non-numeric values that are not spaces are reported as errors.
If you answer N, numeric values are imported as usual. All non-numeric values, including spaces, are reported as errors.
|
Format |
One letter, either Y or N. There is no default |
|
Example |
Type: Y and then press <Enter> |
Implied decimal places
Enter the number of decimal places contained within the quantity to be imported, either 1, 2, or 3, or press <Enter> to default to 0 if the quantities are always expressed as whole numbers.
If the quantity to be imported contains a decimal point to separate whole digits from the decimal positions, the decimal point is used to determine the number of decimal places, and your entry in this field is ignored.
Field number
For delimited field formats, enter the relative field number of the quantity in an import record.
Start Position and Length
For fixed position field formats, specify the starting column number and length of the quantity field in an import record.
6. Lot numbers
Describe the location of the lot number in each import record for lot-controlled items, as follows:
Field number
For delimited field formats, enter the relative field number of the lot number in an import record, or press <Enter> to default to None if you are not using lot numbers.
Start Position and Length
For fixed position field formats, specify the starting column number and length of the lot number field in an import record, or press <Enter> to default to a Start position of 0 if you are not using lot numbers.
|
Format |
Up to two digits or use the option |
|
Example |
Press <Enter> for Start Position |
Field number to change ?
Make any required changes and press <Enter>.
If you defined a new import format, or changed the saved import format, you are asked if you wish to save (replace) the format.
Answer Y to save this import format for use in subsequent import sessions. Only one import format may be retained. (The import format is saved with the I/C Control information data.)
Answer N to use this import format for the current import session only. Any existing saved import format remains unchanged.
After you answer this question, a screen appears for you to select where to print the Physical Count Import Log. The import process then begins.
Using the details supplied in the import format, the data from the import file is transferred into the physical count transactions for the corresponding items and warehouse.
As the data file is being imported, a count of the records being imported and the transactions being updated is displayed.
The count quantity for each item is placed into the first Count qty field of the corresponding physical count transaction. If a count has already been recorded in the transaction, the imported counts are processed as specified in the Duplicate counts field.
Any error conditions encountered during the import session are recorded on the Physical count Import Log, and a message notifying that errors have been recorded in this file is displayed on the screen at the end of the import session.
Use the Worksheet selection to print a Physical count Worksheet.
If you specified the Expanded Physical count method in Control information, the worksheet lists the inventory items with physical count transactions by location or item number within a selected warehouse. Serial numbers and lot numbers may be optionally printed. You can use this worksheet to do an actual physical count.
This selection is also used after actual counts have been entered to show variances in quantity and cost between the suspended on-hand quantities and the actual physical counts. This report also highlights transactions for which no actual counts are entered.
If you specified the Normal physical count method in Control information, the worksheet lists your inventory items by location within any warehouse. You can use this worksheet to do an actual physical count.
For a Normal physical count, refer to the Physical Count Worksheets chapter for instructions on entering Worksheet information.
Select
Worksheet from the Physical count menu.
When using the expanded physical count method, a screen similar to below displays:
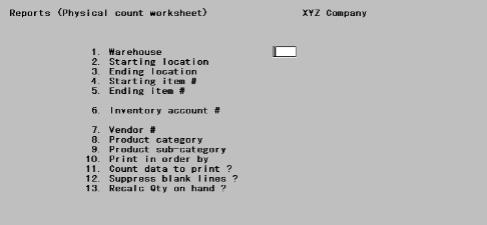
Enter the information as follows:
1. Warehouse
For multi-warehousing, you are asked to specify the warehouse for which the counts are to be printed. Enter the warehouse code.
You may also use the options:
|
<Enter> |
For the Central warehouse |
If you are not using multi-warehousing, you will not see the Warehouse field and all field numbers will be one less than the numbers shown.
2. Starting location
3. Ending location
Enter the range of locations for which the worksheet is to be printed or press <F2> to select First and Last in each field.
|
Format |
Four digits or select the option |
|
Example |
<F2> to use First. <F2> to use Last. |
4. Starting item number
5. Ending item number
Enter the range of item numbers for which the worksheet is to be printed or press <F2> for First and Last in each field.
|
Format |
Up to 15 digits or use the option |
|
Example |
Press <F2> to select First. Press <F2> to select Last. |
6. Inventory account #
Enter the inventory account for which the worksheet is to be printed.
Options
You may also use the options:
|
<F1 |
For the next inventory account |
|
<SF1> |
For the previous inventory account |
|
<F2> |
For the default inventory account (from I/C Control information) |
|
<F5> |
For All inventory accounts |
|
Format |
Enter up to seven digits or use the options |
|
Example |
Press <F5> to select All |
7. Vendor number
Enter the vendor number to print the worksheet for only one vendor, or press <F5> to print the worksheet for All vendors.
|
Format |
Enter six digits or the option |
|
Example |
Press <F5> for All vendors |
8. Product category
Enter the product category to print the worksheet for only one product category press <F5> to print worksheet for All categories.
|
Format |
Enter up to five digits or use the option |
|
Example |
Press <F5> for All |
9. Product sub-category
Enter the product sub-category to print the worksheet for only one product sub-category press <F5> to print worksheet for All sub-categories.
|
Format |
Up to five digits or use the option for All |
|
Example |
Press <F5> |
10. Print in order by
Options
Enter in the order you desire to print the worksheet by using one of the following options:
|
L |
To print the worksheet by location |
|
I |
To print the worksheet by item |
|
C |
To print the worksheet by category |
|
Format |
From the table above, one letter either L, I, or C. The default is L |
|
Example |
Press <Enter> to select the default |
By selecting to print worksheet by category C a new field will appears and ask if you want the print out to be One category per page?
|
Format |
One letter, either Y or N. The default is N |
|
Example |
Press <Enter> to accept the default |
11. Count data to print?
Enter the character that corresponds to the amount of quantity information to be printed.
Enter N for None to omit printing of all quantities. Underlines are printed on the worksheet, for recording the figures while taking the actual physical count.
Enter A for Actual to show the total actual counted quantity for each item as entered in the physical count transaction. The suspended on-hand quantity is also printed for each item.
Enter V for Actual/variance to show the total actual counted quantity, suspended on-hand quantity, and unit cost for each item. The difference between the suspended and actual quantity is shown as a quantity and cost variance. The variance prints as a negative amount if the counted quantity is less than the suspended quantity.
If either A or V is specified, **Not counted** prints on the report for an item if no counted quantities are entered.
In addition, for A or V type reports, serial numbers cannot be printed for serialized items and the field #15 Print quantities on-hand ? will not be displayed.
Options
Use on of the following:
|
N |
For None |
|
A |
For Actual counts |
|
V |
For Actual counts and variances |
|
Format |
One letter from the table above. The default is N |
|
Example |
Press <Enter> to select the default |
12. Suppress blank lines?
Answer Y to eliminate blank lines between items on the worksheet. Answer N if you wish one line to be skipped prior to printing an item on the worksheet.
|
Format |
One letter, either Y or N. The default is Y |
|
Example |
Press <Enter> for the default |
13. Recalc Qty on hand?
Answer Y if you want to print on the worksheet the recalculated quantities on-hand. Answer N if you prefer not to print out the recalculation of the quantities on-hand.
|
Format |
One letter, either Y or N. The default is N |
|
Example |
Press <Enter> for the default |
|
Note |
It is best not to post any transactions that change the quantities of the items being counted until the physical count process is completed. However, if you have then never run a recalculation if both are true:
|
* If you specified None for Count data to print ?, both field #’s 14 and 15 will display. If you answer selected Actual counts or Actual counts and variances then only field 14 will display.
*14. Serial / lot data to print
Enter S to show the serial numbers with an unsold status on the worksheet for serialized items with physical count transactions. Each unsold serial number and its Reference text is printed for serialized items. In addition, committed or loaned is printed for applicable serial numbers.
Enter L to show the individual lot numbers and Reference text on the worksheet for lot-controlled items.
Enter B to show both unsold serial numbers and individual lot numbers for the items.
Enter N for None if you do not wish either serial numbers or lot numbers printed on the worksheet.
Options
Use one of the following:
|
S |
Serial number |
|
L |
Lot number |
|
B |
Both |
|
N |
None |
|
Format |
One letter from above. N is the default |
|
Example |
Press <Enter> to accept the default |
*15. Print quantities on hand?
If you answer N, no quantities on-hand will be printed.
If you answer Y and you have selected to print actual counts, the suspended on-hand quantity, counted quantity, and variance information are shown.
By selecting Z, only the quantities whit non zero value will be printed on the worksheet.
Options
Use on of the following:
|
N |
Not to print quantities on-hand |
|
Y |
Print quantities on-hand |
|
Z |
Print just the Non- zero quantities on-hand |
|
Format |
One letter from above. There is no default |
|
Example |
Type: Y then press <Enter> |
Field number to change ?
Make any needed changes, and then press <Enter>.
The suspension date entered when the transactions were created is printed at the top of the worksheet. If you selected to print actual counts and the transactions were created with different suspension dates, the suspension date of the first item printed is shown at the top of the worksheet. Dates that are different are printed below the item number to which they relate.
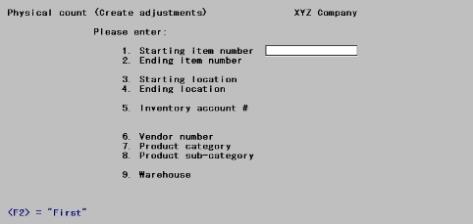
Use this selection to automatically create upward or downward inventory adjustment transactions from selected physical count transactions. This is only available for the Expanded physical count method, as defined in the I/C Control information.
Select
Create adjustments from the Physical count menu.
A screen displays to allow you to specify the range of items for which you wish to create adjustment transactions. Enter information on this screen in the same manner as described for creating physical count transactions.
If transactions are found, this message displays: Inventory transactions are on file - Proceed?. Answer Y to continue, or press <Enter> to default to N to cancel the creation process.
Enter the information on this screen as follows:
1. Starting item number
2. Ending item number
Enter the range of item numbers for which the worksheet is to be printed or press <F2> for First and Last.
|
Format |
Up to 15 digits for both fields or use the option |
|
Example |
Press <F2> select First and Last |
3. Starting location
4. Ending location
Enter the range of locations for which the worksheet is to be printed or press <F2> to select First and Last for both fields #3 and #4.
|
Format |
Four digits or select the option |
|
Example |
Press <F2> to use First and Last |
5. Inventory account #
Enter the inventory account for which the worksheet is to be printed.
Options
Use on of the following options:
|
<F1> |
For the next inventory account |
|
<SF1> |
For the previous inventory account |
|
<F2> |
For the default inventory account (from I/C Control information) |
|
<F5> |
For All inventory accounts |
|
Format |
Enter up to seven digits or use the options |
|
Example |
Press <F5> to select All. |
6. Vendor number
Enter the vendor number to print the worksheet for only one vendor, or press <F5> to print the worksheet for All vendors.
|
Format |
Up to six digits or use the option |
|
Example |
Press <F5> for All vendors |
7. Product category
Enter the product category to print the worksheet for only one product category, or press <F5> to print worksheet for All categories.
|
Format |
Enter up to five digits or use the option |
|
Example |
Press <F5> for All |
8. Product sub-category
Enter the product sub-category to print the worksheet for only one product sub-category, or press <F5> to print worksheet for All sub-categories.
|
Format |
Up to five digits or use the option for All |
|
Example |
Press <F5> |
9. Warehouse
For multi-warehousing, you are asked to specify the warehouse for which the counts are to be imported. Enter the warehouse code.
Options
You may also use the following options:
|
<Enter> |
For the Central warehouse |
|
<F5> |
For All warehouses |
If you are not using multi-warehousing, you will not see the <Warehouse> field and all field numbers will be one less than the numbers shown.
If transactions are found, this message displays: Inventory transactions are on file - Proceed ?. Answer Y to continue, or press <Enter> to default to N to cancel the creation process.
If inventory transactions are not found, or if you select to proceed, a second screen appears similar to this:
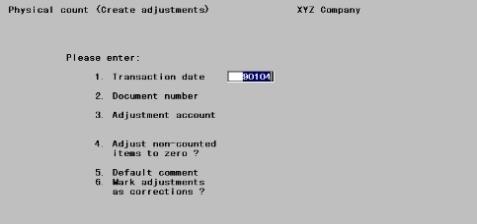
1. Transaction date
Enter the date to be used as the transaction date for the adjustment transactions or press <Enter> for the System date.
2. Document number
Enter the document number to be used for the adjustment transactions, or press <Enter> to default to PHYS-COUNT.
|
Format |
Up to ten characters |
|
Example |
Press <Enter> for the default |
3. Adjustment account
Enter the number of the G/L account to be used for adjustments.
The account number entered must be a valid General Ledger account number.
4. Adjust non-counted items to zero?
Answer Y to create adjustments for items whose physical count transactions do not have actual counts entered. Otherwise, answer N.
If you answer Y, adjustments are created in the amount necessary to adjust the item's suspended on-hand quantity to zero.
If you answer N, adjustment transactions are not created for items if actual counts are not entered.
|
Format |
One letter, either Y or N. The default is N |
|
Example |
Press <Enter> for the default |
5. Default comment
|
Format |
25 characters |
Enter the comment to be used as a default comment for the adjustment transactions, or press <Enter> to leave this field blank.
The default comment is used only if the physical count transaction does not already have a comment entered.
|
Format |
Up to 30 characters |
|
Example |
Press <Enter> to leave this field with no comment |
6. Mark adjustments as correction ?
Enter the adjustments transactions, if you want them to be saved as a correction or an adjustment.
|
Format |
One letter, either Y or N. The default is N |
|
Example |
Press <Enter> to accept the default |
Make changes as usual.
You are asked OK to create adjustments?. Answer Y to create adjustment transactions for those items whose actual counts differ from the suspended on-hand quantity.
An upward adjustment is created for an item if the actual count is greater than the suspended on-hand quantity. A downward adjustment is created if the actual count is less than the suspended on-hand quantity.
If specified, adjustment transactions are also created for items that have no actual count quantities entered. The adjustment is created in the amount necessary to set the quantity on-hand for the item to zero.
No adjustment is created for an item whose actual count is the same as its suspended quantity on-hand.
Physical count transactions are then deleted for all items within the range specified, including those with actual counts for which adjustments were not created, as well as those without actual counts entered.
The adjustment transactions are not automatically posted. They may be edited as required and posted, using the Inventory selection.
If adjustments were created for serialized items, use Inventory (Enter) to enter the actual serial numbers that are to be adjusted up or down for the item
|
Example |
After you have created the adjustment transactions for the items specified (by answering Y to OK to create adjustments?), you may exit this selection and use Inventory to view the adjustments and to post them. When posting completes, return to this point in the manual. |
Read this section if you wish to continue computer processing or movement of physical goods that affects on-hand inventory levels for items that are being counted.
The procedures outlined below allow you to produce an accurate period-end valuation, even though your quantities or costs may have changed while you were counting.
The Physical count (Create adjustments) selection creates inventory adjustment transactions with the actual cost at that time. If other transactions that affect cost have taken place between the time of valuation (counting) and the time of posting the adjustments, the value of the adjustments will not be correct.
If you plan to continue normal operations during the counting period, but wish to be able to print a final Valuation Report, follow these steps (in addition to the steps presented at the beginning of this chapter):
|
Step |
Description |
||||||||||||
|
1 |
After creating the physical count transactions (step 1 in performing an expanded physical count), export these files/tables by using the standard Invenotry Control utilities (ICUTIL - found in the top-level PBS folder) :
Export Layers only if you are using a LIFO or FIFO valuation. |
||||||||||||
|
2 |
After entering, verifying, and correcting the actual count data for the physical count transactions, save a copy of all Inventory control data (typically done using the Control data utilities export function (CTLUTIL) located in the top-level PBS folder. Then load the four files/tables that were saved in step 1 back on to your system. Run Physical Count (Create adjustments) and post the adjustments using Inventory (Post).
At this point, you must stop all computer processing until you complete steps 3 and 4 below. |
||||||||||||
|
3 |
After posting the adjustment transactions, run the Valuation report. This reports your inventory value as of the end of the period.
If you think you may need to reprint this exact report at some other time, export Items, Status, Serials and Layers again. |
||||||||||||
|
4 |
Restore all of the Inventory control data that was saved in step 2.
You now have current, adjusted inventory available for reporting.
Note that the value of the adjustments posted in step C would be different than those posted in step D because of cost changes. If this difference is considered an end of period adjustment for the prior period, then add this difference to the Valuation report run in step C to arrive at a final end of period value. |
Until the actual counting process is completed, it is a good practice not to remove or bring in physical goods to the area where goods are being counted.
If goods arrive after the count transactions are created, place them in a separate area or mark them so they will not be counted. If goods must be removed after the transactions are created, record the quantities being removed and include the quantities in your counted quantity figures.